
COP4331 - Web Stack Projects
Table of Contents
Over the summer of 2021, I worked on a variety of different personal projects - all documented here - but alongside this I took on two classes critical to the completion of my Computer Engineering degree. The most time-consuming one, COP4331 (Processes of Object Oriented Systems) focused on developing full-stack web applications in two different technology stacks while also working in large groups with other students. While the technology was something that I already had a handle on through my personal projects, other students weren't so fortunate: nothing about what we were doing had been taught up to this point. As these students were in my group, I took the role of Project Manager and helped guide students towards success.
Here is what we put together.
Project 1: Contacts Manager

The first project was assigned to us on the very first day of classes, with our groups already having been randomly assigned members. We were to create a full web application with CRUD (create, read, update, delete) capabilities centered around storing a user's contact book. In addition, we were required to create this project utilizing the LAMP web stack (Linux, Apache, MySQL, and PHP).
Hosting / Setup
On this first day, I set up and arranged our hosting and DNS provider (DigitalOcean for hosting, as recommended by the professor, and Name.com thanks to the free domain name for students). We also all self-assigned into our roles for the project - me with Project Management & API design, and the five other members into whatever roles they felt most comfortable with. We ended up with two on the back-end (developing the PHP scripts to serve as the API's functionality), three on the front-end (writing the HTML/CSS/JS to provide layout and interaction functionality), and one on the database (creating the structure of our tables / relations - he worked on the back-end team once this was done).
We created a Discord channel to organize ourselves, and I created ourselves a github repo for our code.
Turns out, all but one of them had any experience with GitHub or Git before. So, that was the first thing I guided them through.
API Documentation
This project was the first time where I'd been asked to, in-depth, document an endpoint. On top of this, we were required to use a service called SwaggerHub to build this documentation. This service lets you write a .yaml file describing the various endpoints of an application, the parameters, responses, and various schemas that it accepts. It's remarkably useful, and even allows you to send requests from the page itself for interactive demonstrations. I quickly learned the ropes and put together our API endpoints by the third day, as to let the back-end team get started on the implementation.
You can view the documentation here.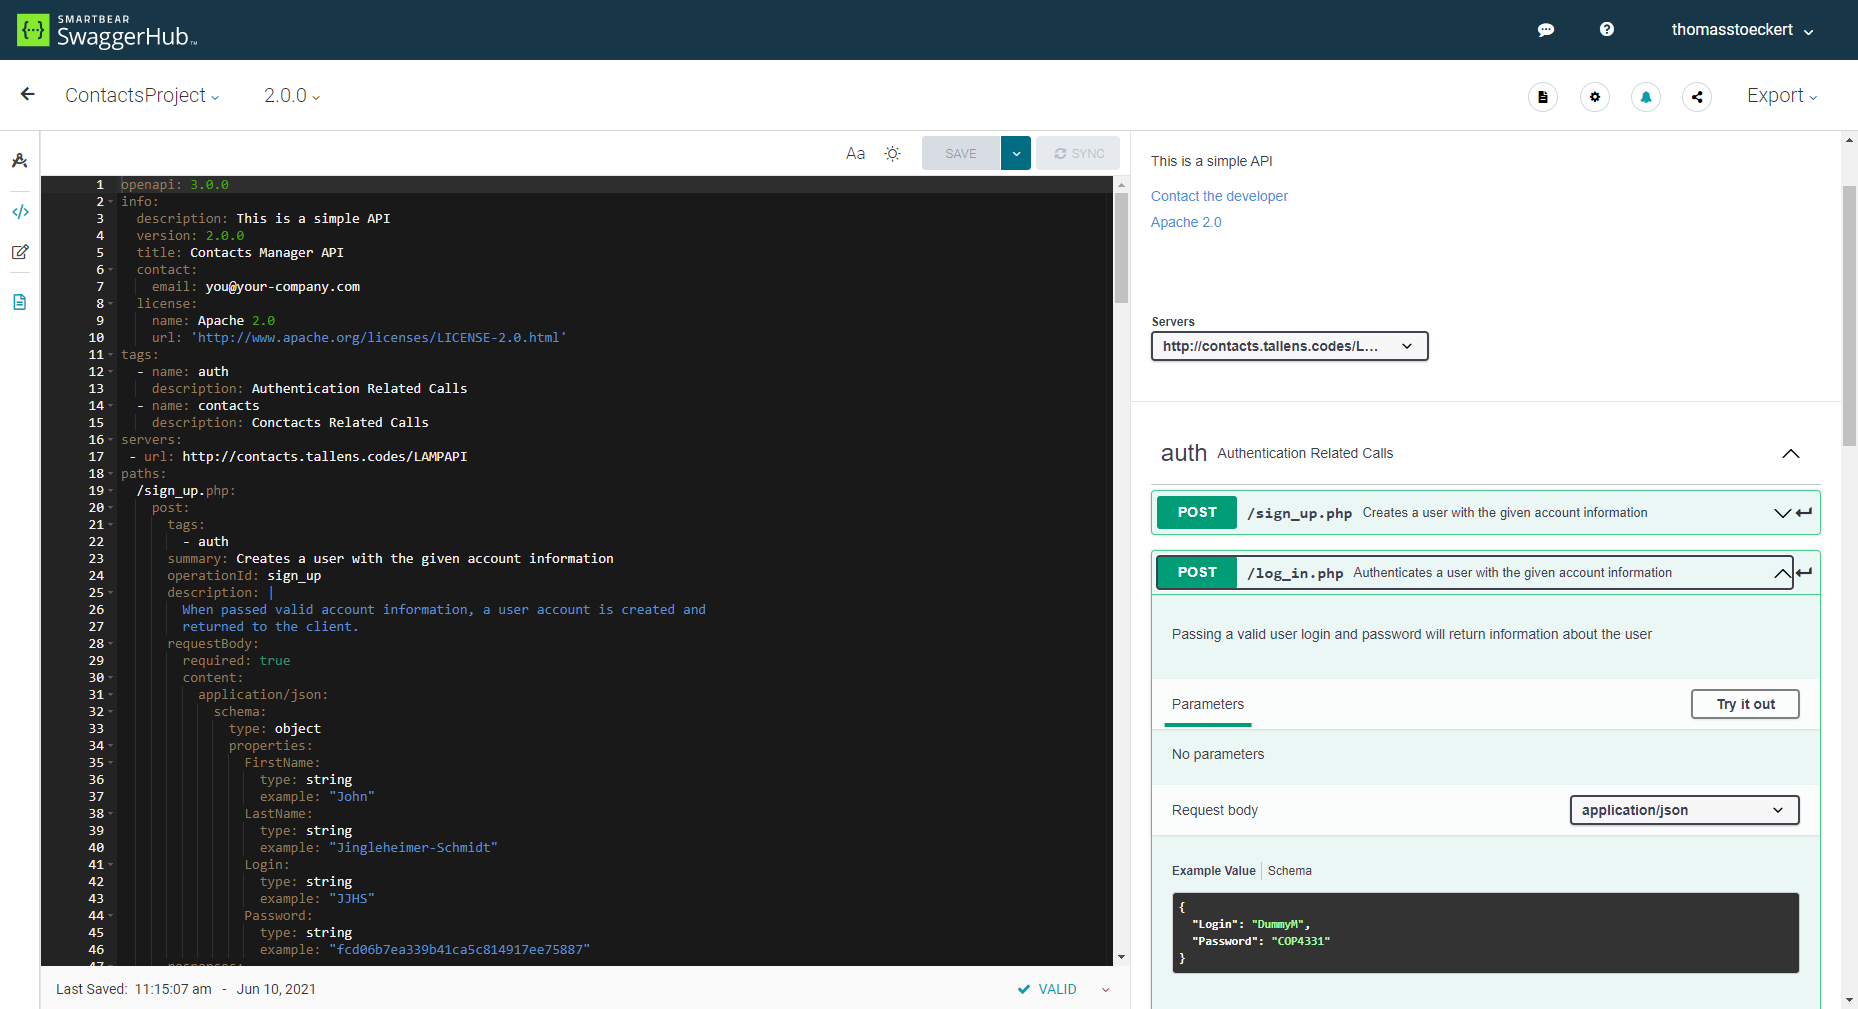
You'll note here that our authentication is done through sending a plain-text login and password element through a POST request to the server. We actually use a hashing algorithm on the front-end side to hash the user's password before we send it to the server (as required by professor), but even then, it's not the most secure method.
In addition, every single endpoint was described as a POST request. This really isn't good practice, as there are other HTTP methods that could yield better functionality or more concise operation of the application, however, I didn't put in the effort at the time. This was noted at the time, and I took advantage of this on Project 2.
Back-End
The back-end of this application is remarkably simple - as we don't have much advanced functionality, everything is done through some straightforward requests to the MySQL database, formatting the results, and sending that back to the client. It was a lot of students first forays into PHP, but they picked it up quite quickly.
Front-End
No student on the front-end had worked with HTML/CSS/JS before, or, at least not in a full project's capacity. They did start picking up relatively quickly, however, and we got a few simple pages (sign-in/log-in/create) all done quite quickly. However, the interaction between the front-end's JS functionality and the rest of the application just didn't quite make sense to the students initially.
Following the example the professor had provided, we were to build static HTML sites, styled using standard CSS (or using Bootstrap, which we did), and then populate the site using data from our back-end once the site was loaded using javascript's onReady listener. Not the most... standard way of doing things. But it worked, and was straightforward to implement.
I implemented a few example pages for the front-end team, guiding them through the process via one-on-one video calls through discord. After they felt confident, I let them run free, and we ended up with a solid, competent project by presentation time (Total time: 3 weeks)
Tour

When a user accesses the site and they're not logged in (tracked through a user cookie) they're redirected to the login page. From here, they can visit the sign up page to register an account, or sign in directly here.

A user's homepage is empty by default - a request of the professor. Typing anything into the live search box causes the results to update (results are updated on each keypress). The query is compared to a joined string of "firstName lastName" through some fancy MySQL shenanigans. This allows a user to search for either a first name, last name, or both.
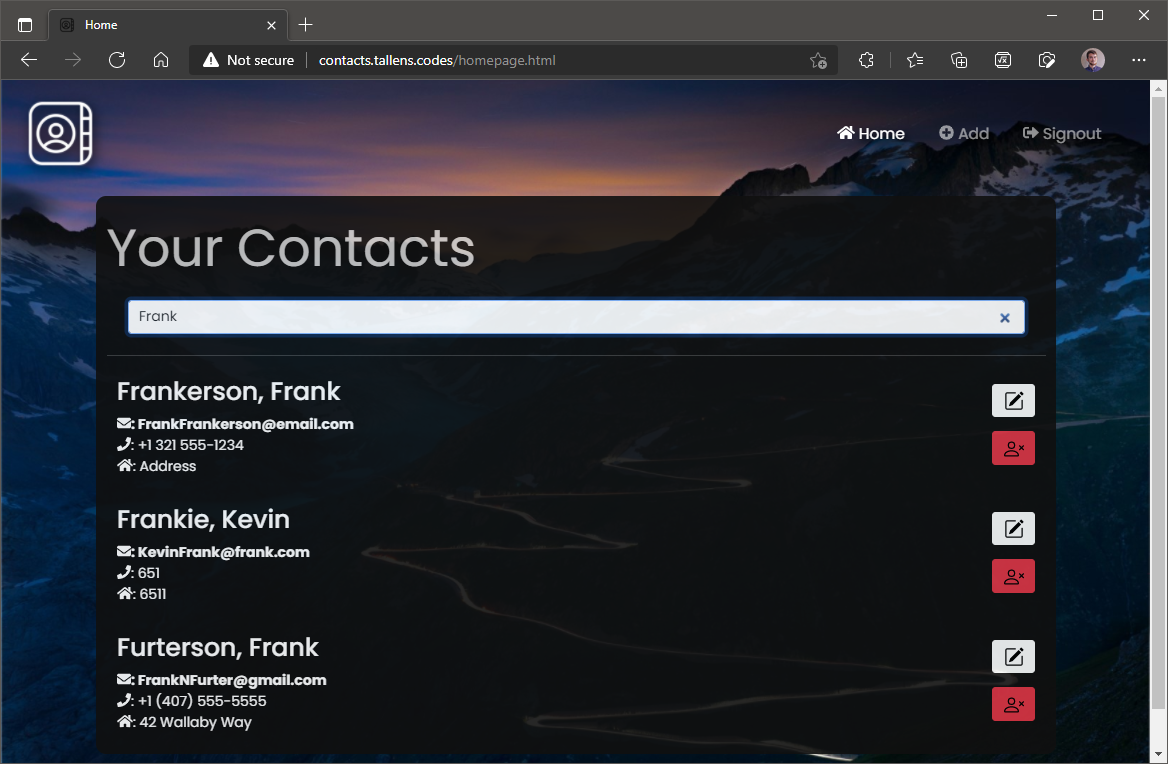
Each result lists the last name, first name (sorted as such), as well as email, phone, and address. You can edit or delete a contact via the buttons on the right-hand side. Adding a contact is done via the button in the top right corner.
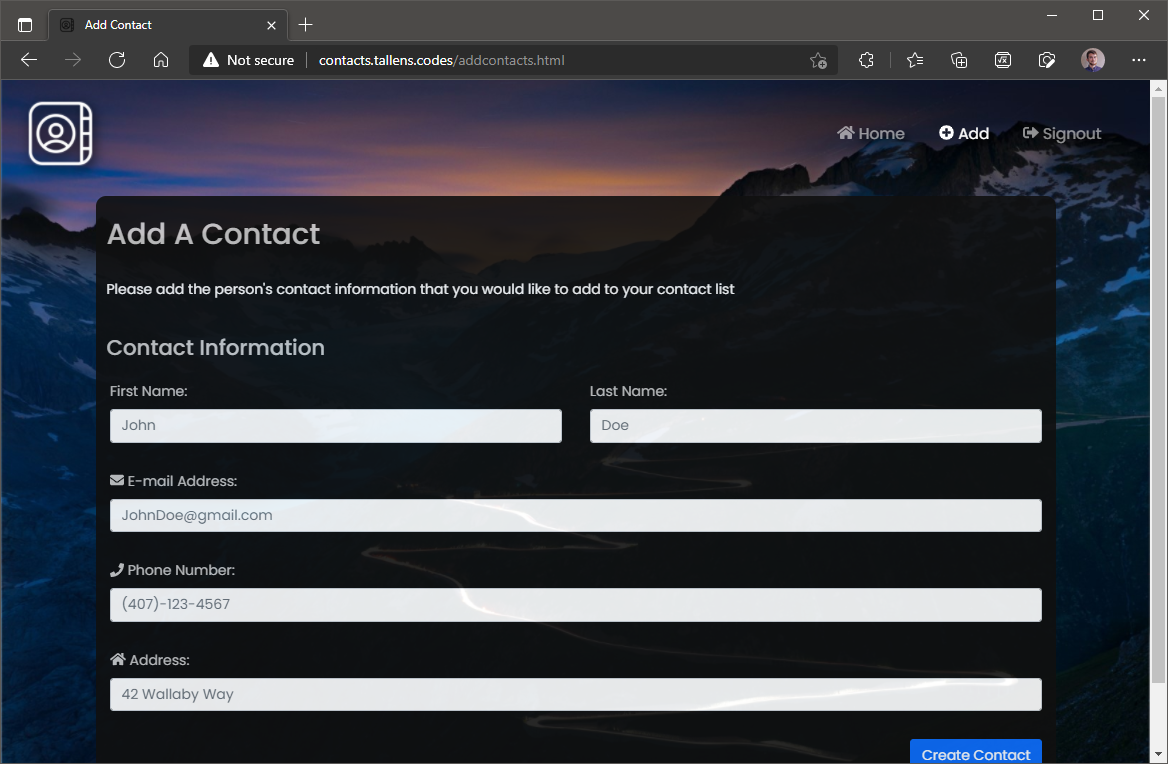
Creating a new contact is done through this page - some validation is done to ensure you have at least one of the name fields entered - you can't have a completely null contact. Once you click "Create Contact," the page clears the entry fields and lets you know it was added successfully, allowing you to enter more.
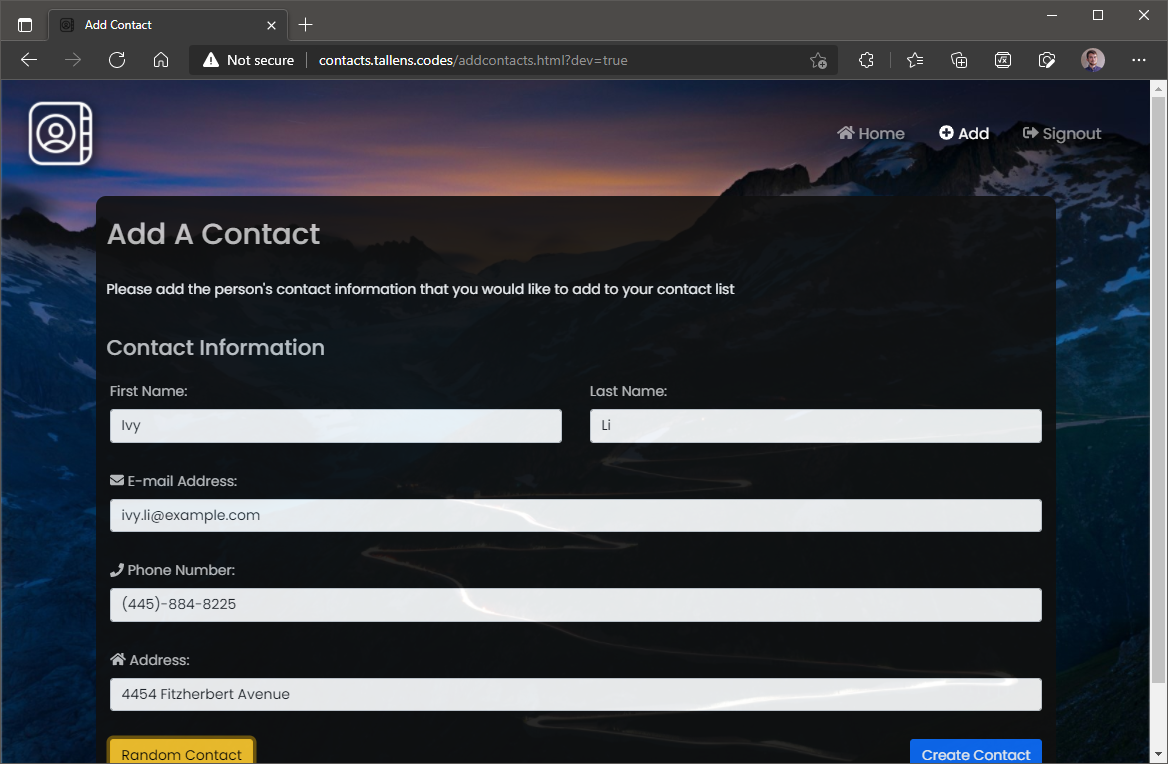
For ease of testing, I also included a hidden developer button to the page. If you visit with "?dev=true" on the end of the URL, a button appears that populates the fields with some information fetched from randomuser.me. This allows a developer to quickly generate a ton of example contacts quickly, all with realistic-sounding names and addresses.

Editing an existing contact is very similar to the "Add Contact" page - just with the limited functionality that one might expect from an "Edit Contact" page. Auto-populated fields, validation of inputs, and automatically closing/saving the page when you hit "Update"

Finally, deleting a contact leads to another page for confirmation, including a review of the contact's information (Just to make sure it's the right one).
Project 1 Closing Thoughts
This project was my first time attempting to lead a group in a more technical project (my work on Hocus Hollow was also a project management role, but for a creative team), and it was an interesting experience. My knowledge and expertise of both the subject and understanding of what we needed to do led me towards more of a mentorship role than pure management, and the short timescale meant it ended up being a quick, light, experience, but it wasn't bad. The only part of this that I wish I had done better, management-wise, was pushing the front-end team to get more done earlier. This is a running theme, as you'll see in the second project.
You can view the source code for Project 1 here: COP4331-Group15/COP4331-Contact-Project (github.com)
I've taken down the host of Project 1, so it will not be available to browse, unfortunately.
You can, however, view our presentation online here:
The second project started immediately after the first project, with a whole different set of challenges. Here's how that went.
Project 2: Hercules' Notebook
The second project was immediately a much different beast when compared to our first. Our requirements grew as our flexibility did, and our technology stack was shifted to be totally different in every way. All our experience from the last project was effectively worthless, as every part of the stack was changed fundamentally. This time, we were to develop a project (of our own design) that included a dedicated back-end, web site, and mobile app, done using the MERN (MongoDB, Express, ReactJS, NodeJS) stack. In addition, we were required to use some token-based system for authentication, either with JWTs (JSON Web Tokens) or some alternative, and we need to have email verification.
We quickly settled on our plan of an automated workout scheduler, thanks to one of our teammates planning/designing something early on. From there, we approached the project in much the same way we did before, inadvertently leading us to replicate issues that became only greater the second time around.
The Idea
One of our teammates, Nicholas Habryl, established the plan and functionality of the app when away at a camp during the first week of development. In brief, the application was to be a system that would generate a month's worth of workout plans based upon user-configured "splits," or, repeating patterns of workouts. Each workout would contain individual exercises, which have information like "repetitions," "duration," "muscle groups," etc.
The real fancy part of the application was the ability it had to re-adjust the generated schedule to work around given intrusions to the pattern. Say you spent a whole day swimming instead of whatever you had planned on your schedule. Entering that in the application as a date-specific or "custom" workout would then shift the split/schedule around your change.
It's a relatively simple idea, but it works really well for time constraints of the project. However, it took some time for every member to understand the desired functionality, leading to a lot of delays in the development process. I lay that fault at my own feet for not spending the time to make sure everyone on the team knew what the end goal was, and plan to work on that in future projects.
Hosting / Setup
Similarly to the last project, we used a series of github repositories for the various aspects of the project. Thanks to the nature of using NodeJS for both the front and back-end components, however, our hosting was done through Heroku's free service. Each part of the project was set up in its own heroku dyno, and was set up to pull automatically from their respective repos. This way, any time a teammember pushed a commit onto our main branches, the server would update! Great / convenient for testing
API Documentation
Once again, we were required to use SwaggerHub to organize and document our API endpoints. With my experience from the first project, I quickly put together something that featured just the pure CRUD operations for each part of our data structures, but then added in more advanced back-end functionality; namely the calendar/year/month endpoint.

You can browse the SwaggerHub page for this API here.
As you can see in the screenshot above, the various endpoints all had appropriate HTTP methods for their functionality - GET for fetching information, POST for adding new information, PATCH for updating, and DELETE for removing. However, the back-end team insisted on implementing this functionality on different paths, despite the fact that express - and HTTPS in general - allows for different behavior based upon the HTTP method that accesses the path. Ah well.
Database
The data storage of the application was done through a NoSQL database this time - as required by the professor. His recommended medium of storage was to use MongoDB and Mongoose to manage connections and interactions, however, my prior experience with Firebase on the LogRide project and the additional authentication requirements of the project led me to choose a Firebase project with its built-in authentication functionality and the real-time database data storage component. The back-end used the axios package to communicate with the database using its REST API.
Back-End
The back-end of the application was written using Express, a server framework for NodeJS. This allowed us to write the server-side logic in the same language as the front-end, allowing us to (theoretically) share data structures and re-use code. However, this didn't end up becoming something that we relied upon.
The back-end team went quickly into development of this part of the application shortly after I finished the SwaggerHub, completing the core of the functionality within about two days. A later, more advanced function (the calendar generating endpoint) ended up taking about two more days to complete, but that was a later addition.
Authentication
Like I mentioned previously, we used Firebase for our authentication. This provides some... odd design choices, however. Firebase is designed to work AS a back-end, with the mobile or web applications that use it using only it for data storage, authentication, and more. However, our project required us to have a discrete back-end component. As such, the funky behavior with the REST API use.
In the end, the way I ended up having us handle authentication went as follows:
- The user signs in on the application (done via firebase on the front-end)
- The user encounters/triggers some functionality that relies on firebase
- The front-end gets an "Access Token" from firebase, attaches it to the outgoing request via the HTTP header
- The back-end receives the request, and takes the access token from the header
- The token is validated using a firebase admin application connection.
- Once validated, the user's status can be used to validate/invalidate a request, or be used to identify them.
- The user's access token is passed along as part of the back-end REST API communication to the Firebase database, ensuring only logged-in users can access it.
It's... messy. While theoretically sound, having this many points of possible failure just isn't recommended for a proper enterprise application. I would not recommend doing something like this unless bound by strange requirements.
Front-End
The front-end was built using standard ReactJS alongside MaterialUI templates and components for quick, easy interface development. Once again, the axios NPM package was used to assist in the communication between the front-end and back-end, with Firebase handling authentication.
Screenshot Tour
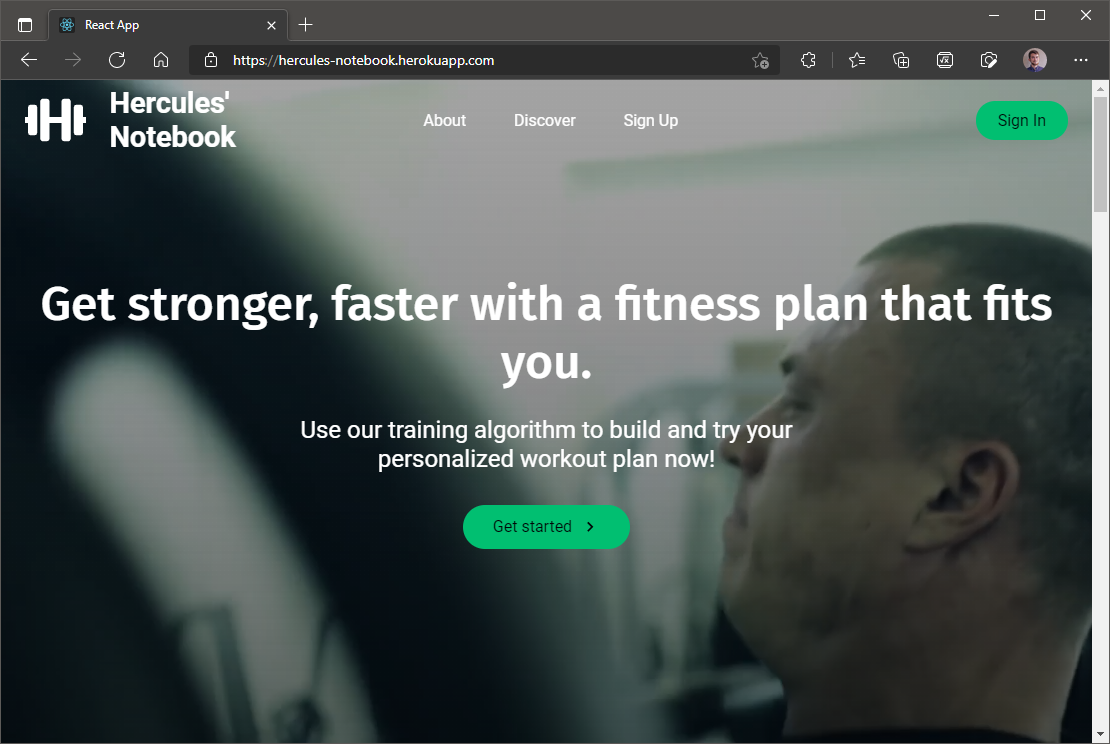
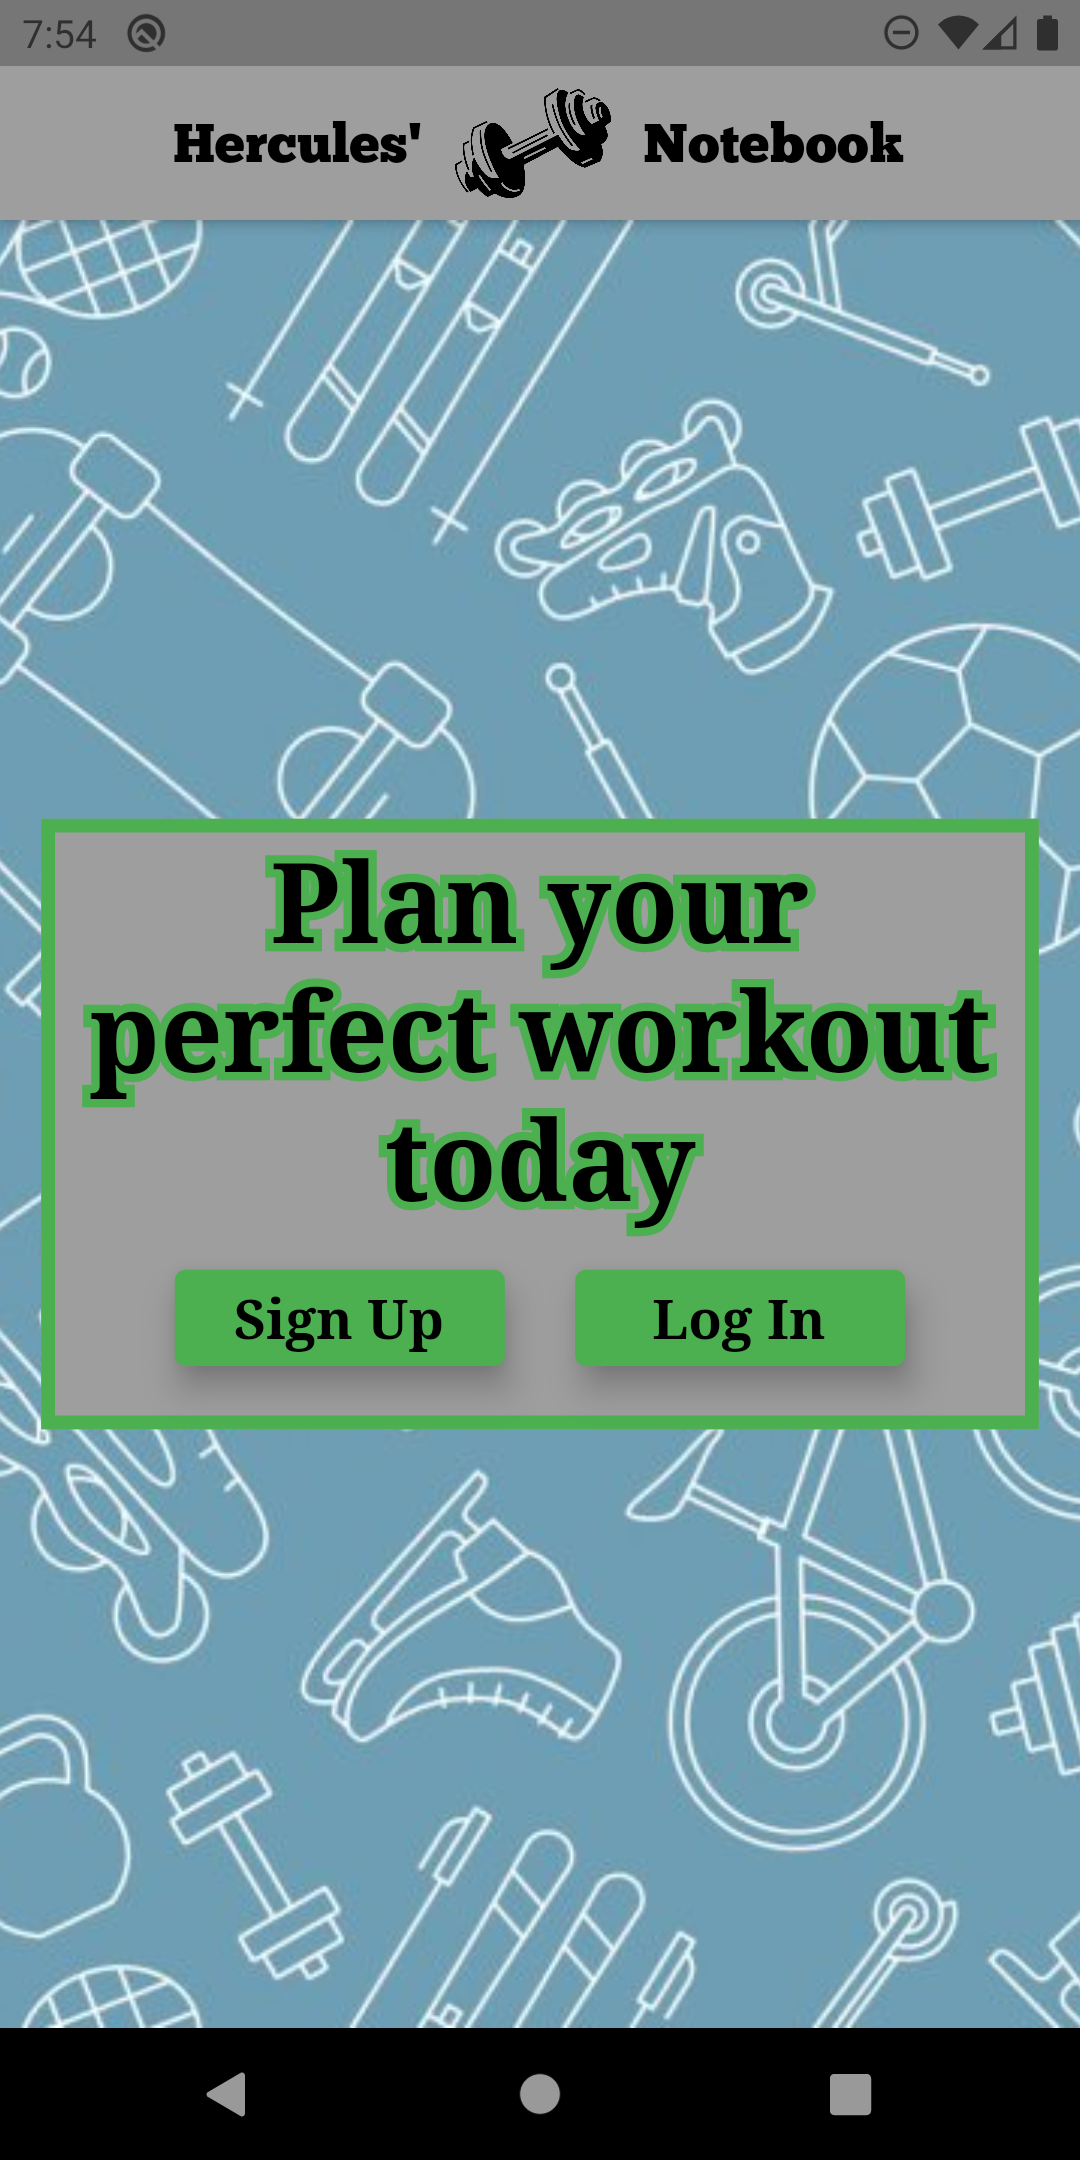
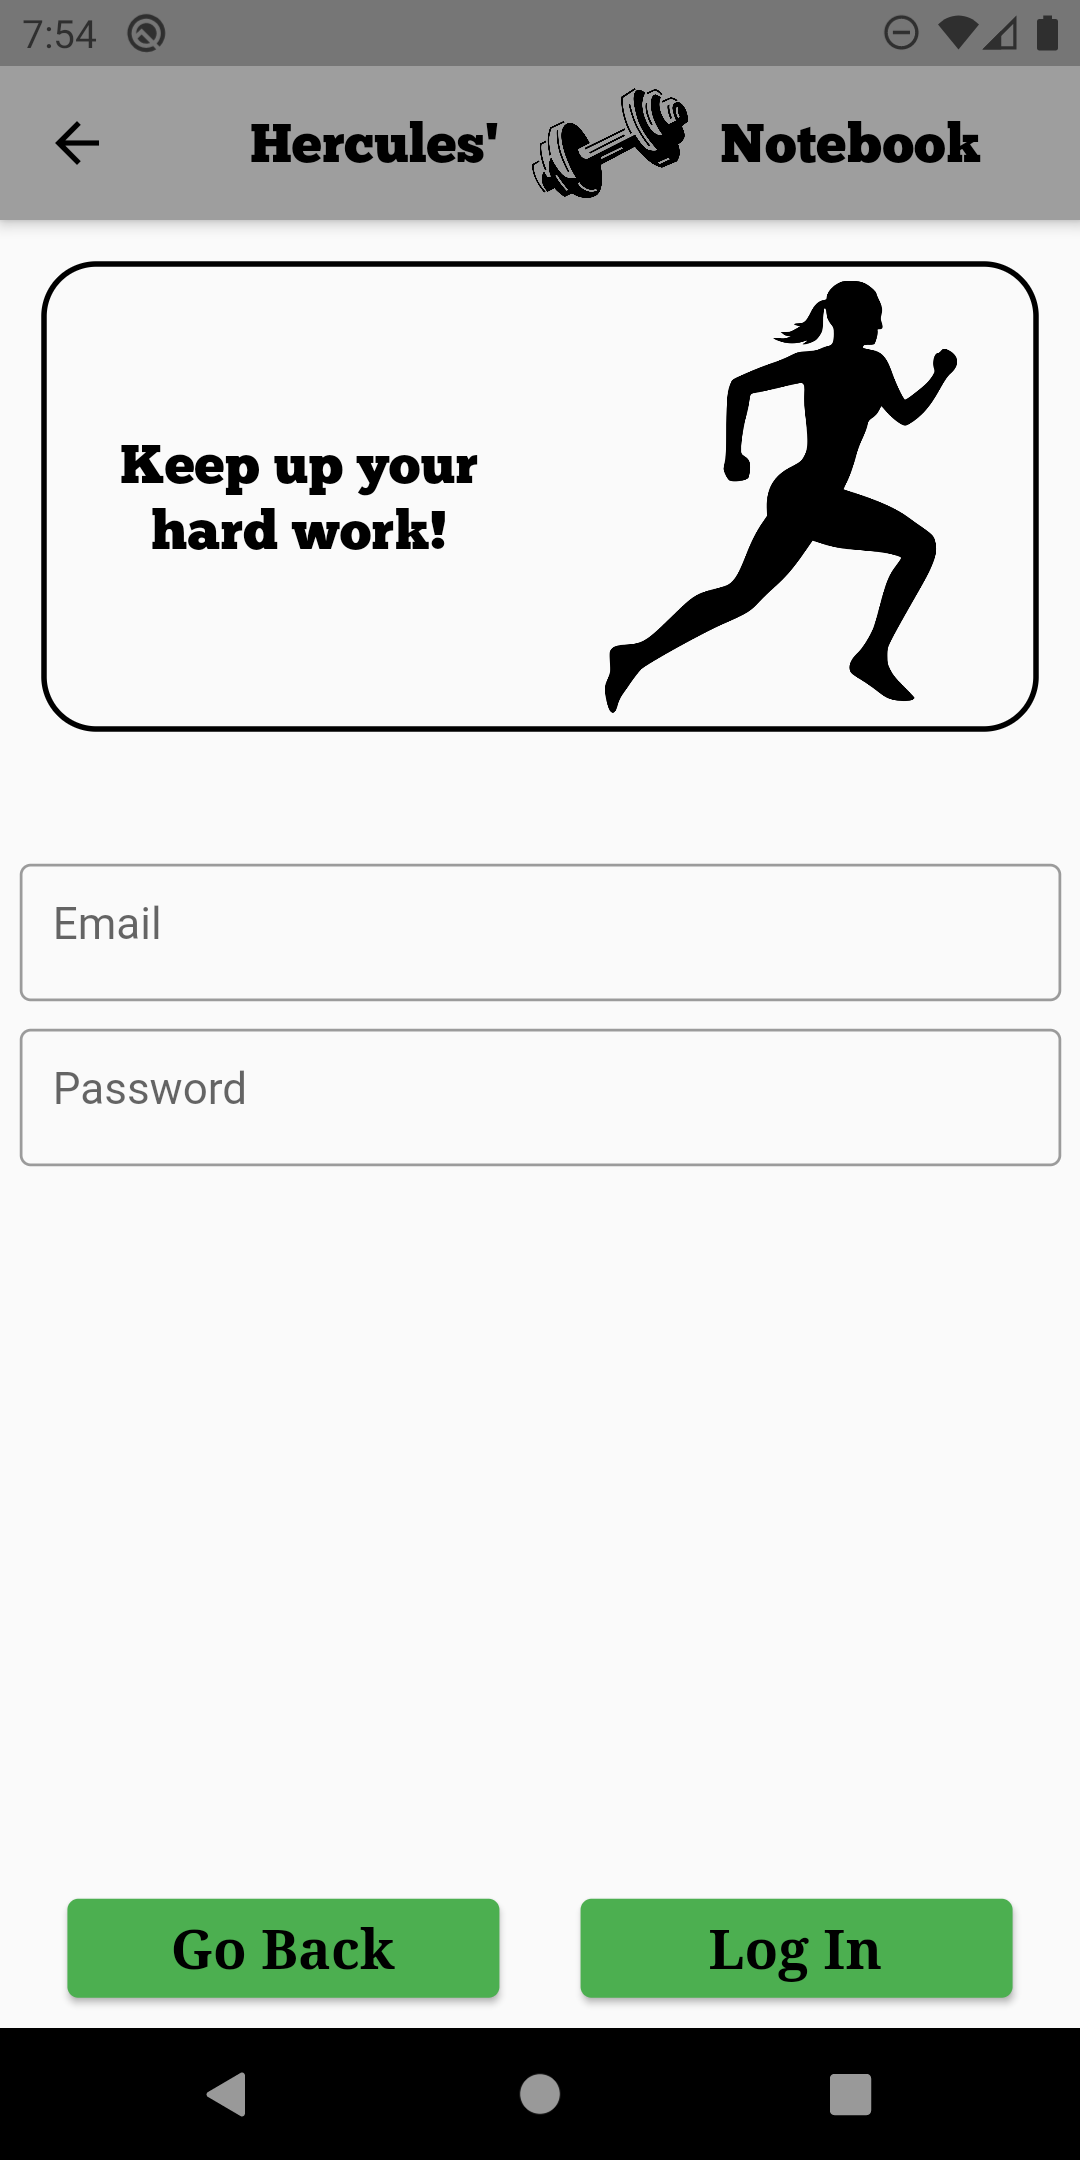
When a user first navigates to the site, they land on a modern, clean landing page that describes the functionality and feature-set of the application as well as provides some basic "about" pages that document the team that made it, as well as a fancy video of people doing exercise.
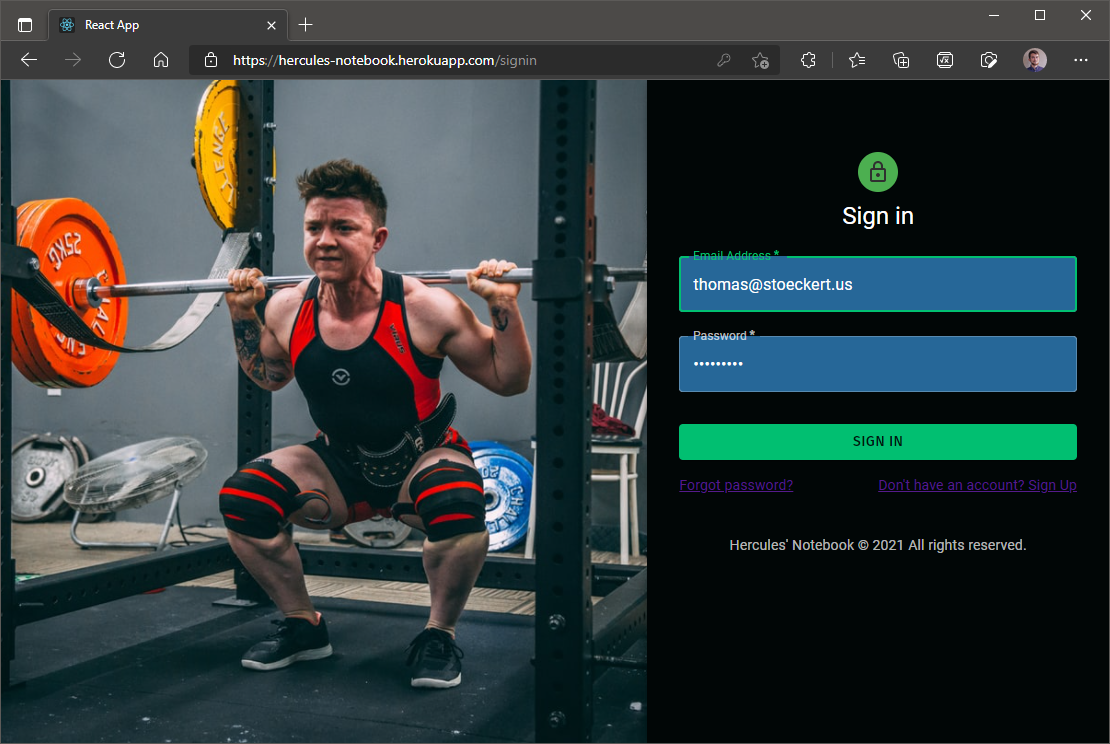
Clicking "Sign In" or "Sign Up" brings you to their respective pages. The left side of the site has pictures of people exercising that is different every time.

Once you sign in, you're taken to the main dashboard / interface of the application.
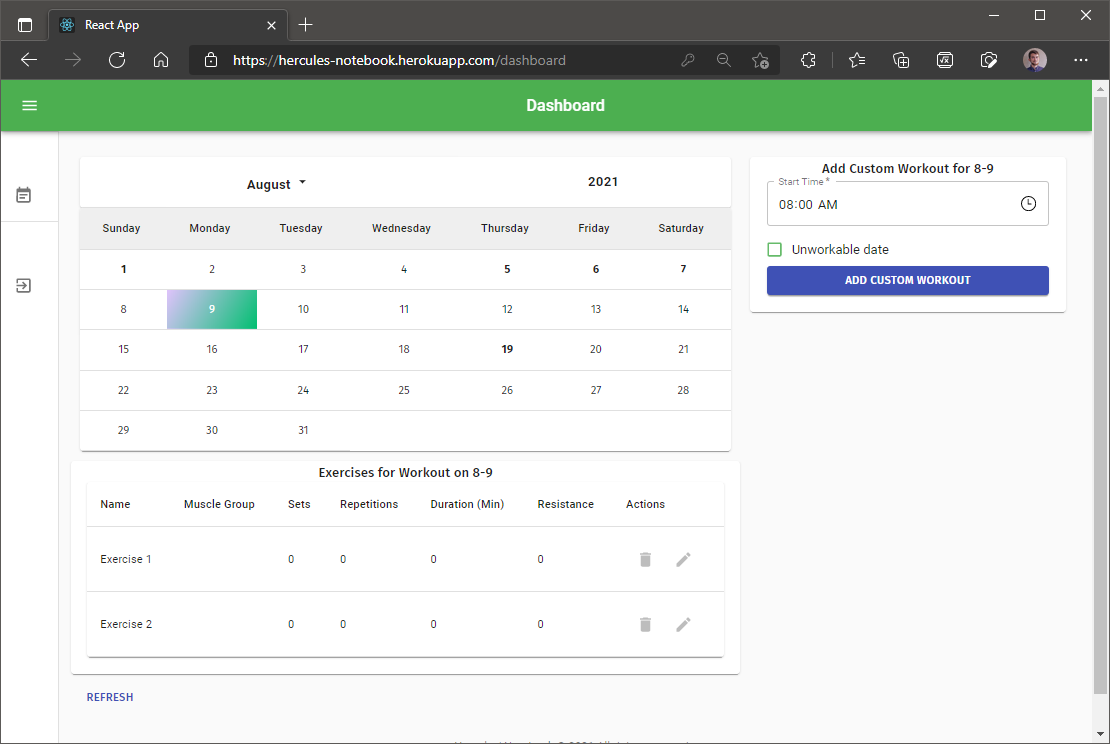
On the left-hand side, underneath the hamburger icon, is the sign-out and split edit buttons. In the center of the page, however, is the calendar interface. Here, a user can select the month they want to view, and then view the various dates of the month. If a day is in bold, then the day either has no workout or a custom workout. If the day is not in bold, then it is part of the split.
Clicking on a given day updates the table beneath the calendar with the exercises that are part of that day.
You can also mark a day as having a custom workout, by hitting the button in the top right of the interface.

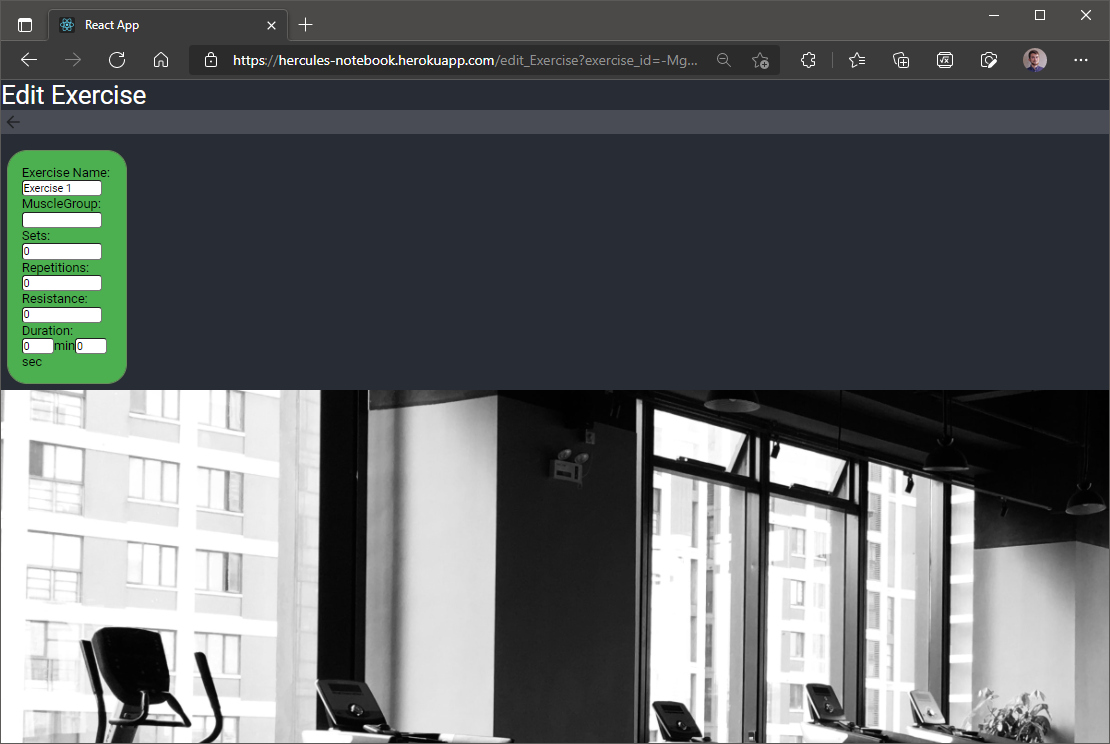
From here, you can edit or delete exercises, edit the custom workout parameters, and generally interface with the aspects of the exercises for that workout.
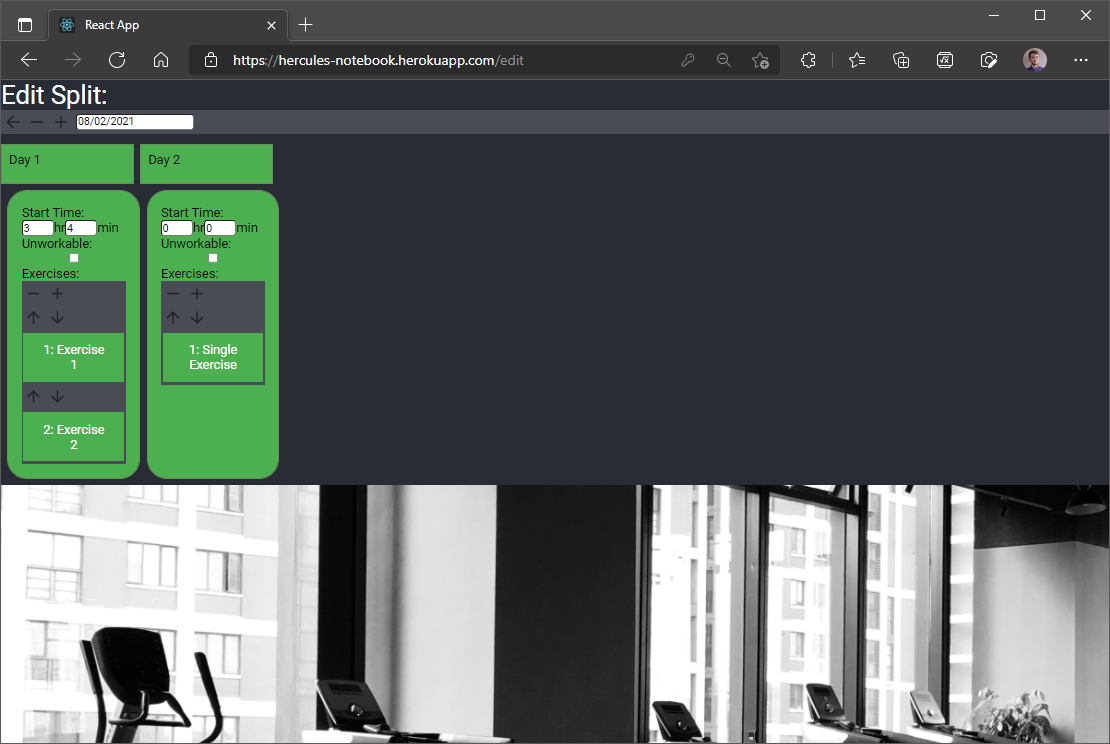
The "Split" editor was developed a member of the front-end team that had his own visual style, as such the difference in layout. Nevertheless, the interface had some nice functionality. Each of the rounded rectangle "days" could be dragged around, allowing you to shift workouts between days. In addition, the exercises on a day can be reordered via the up/down buttons. Clicking on an exercise lets you edit it on the "Edit Exercise" page.
Mobile
The mobile application was built using Flutter, by my recommendation to the mobile team. They quickly got to work and made a basic, functional UI, but were faltering when it came to state management and communication with the back-end. At this point, I stepped in and helped the team via direct four-to-five-hour sessions each day they needed help to guide them through the process. It should be noted, however, that I am very proud of the team for what they accomplished - all the user interface and functionality was implemented by them, with my help being mostly guiding or answering questions.
Screenshot Tour
The splash page is simple, but presentable.

The login and sign up pages are nearly identical, with the only differences being some flavor text or iconography differences.

The main interface is fairly similar to the web application - unfortunately, we couldn't get the same bold highlighting the web interface has for custom/empty days, but the content is still there. Clicking on any given day loads the exercises for that day at the bottom half of the interface, with the plus button to add a custom workout or a new exercise to the existing custom workout.
Clicking on the actions button on the top right takes you to the split editor page, made by the same member who created it on the web application.

(These screenshots were from an earlier build of the application - The index number following the "Header" or "Header exercise" strings were eventually replaced with the name of the workout / exercise).
On this page, a user can edit their exercises / workouts, with the same drag and drop functionality present on the site. Clicking on an exercise selects it, and then the exercise can be edited via the "Edit Selected Exercise" button at the top of the page.

Project 2 Closing Thoughts
The front-end and mobile parts of the project, unfortunately, weren't started until the last week of the project's life cycle (somewhere around four-five total weeks). This, in addition to a lack of experience using either technology by their respective teams, led to an unfortunate crunch period. I worked to make that experience as painless for the teams as possible, by working directly with them whenever they needed my help to ensure there was no point they were practically "stuck" and unable to progress.
However, I know I could have and should have done better when it came to communication and task prioritization over the length of the project. It's something I'll try to keep in mind in every future group project.
Once again, I've taken the actual site host offline, so you won't be able to access it yourself.
However, you can view the source code for all of our summer projects at COP4331 - Group 15 (github.com)
And our presentation for Project 2 is embedded down below.