
PiraSea: A WebGL Game
In the Fall of 2021, I took at class at UCF called CAP4720: Computer Graphics with professor Sumanta Pattanaik. I'd been really interested in working on lower-level graphics programming work, as I got a small taste of it from both my time at Universal Creative and from a favorite programming channel of mine on YouTube - Sebastian Lague. But this class finally gave me the excuse to dedicate time to the craft, as well as the resources and structure I needed to get started.
This is the final project from this course, an assignment where students formed small groups to design and develop simple games using only WebGL and JavaScript. Initially, the project was supposed to have minimum group sizes of 15 students, but that was a crazy idea, so we eventually bargained the professor down to just two. My partner - someone I was already working on other projects with at UCF - had already seen my original Sailing Ship demo, and we quickly decided upon developing it further into a full game. After about three weeks of work, it is done:
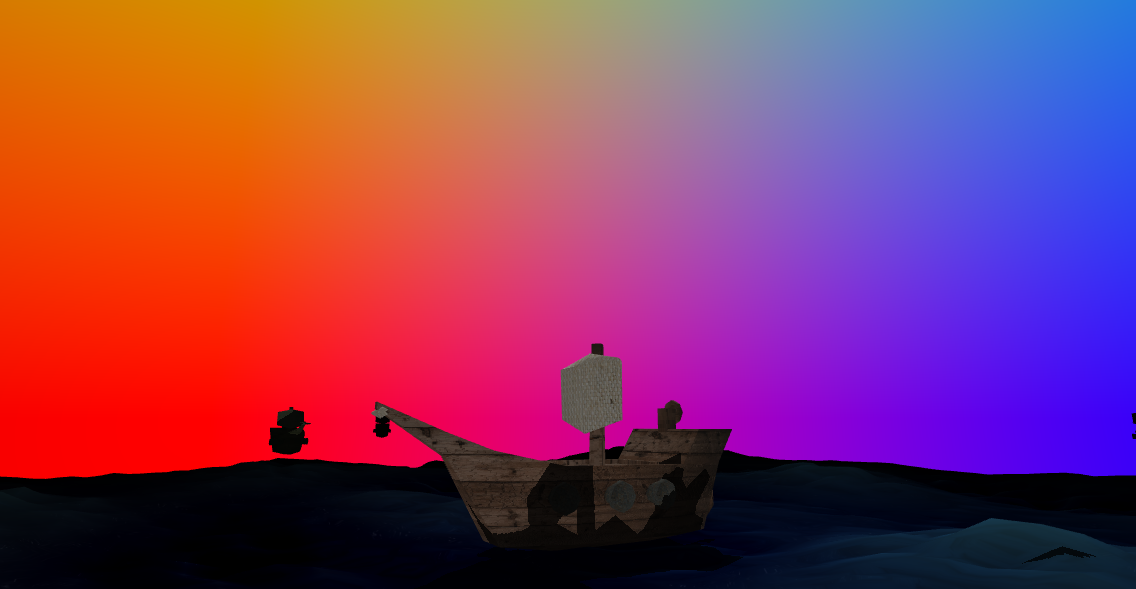
PiraSea is a "thrilling" adventure on the open seas, where you take the helm of a spunky little pirate ship out to prove itself in the dangerous world of swashbuckling. As you work to make your claim as the most fearsome pirate upon the vast, infinite ocean, you'll slowly upgrade your capabilities with the booty you scrounge from fallen foes. You'll want to be careful, however, as your strength will inevitably draw more challenging foes from the open ocean, ready to take you on and claim your title. Are you ready to test your mettle and prove, once and for all that you are the most fearsome pirate in the world?
You can play PiraSea now on your desktop, laptop, or any device with a web browser, keyboard, and mouse at the link below:
PiraSea / Thomas Stoeckert / Observable (observablehq.com)
How to Play
PiraSea is controlled much like a typical driving game - you use the "W" and "S" keys to increase / decrease your forward velocity, and the "A" and "D" keys on your keyboard to turn left and right. You can also press (or press-and-hold) the "Q" and "E" keys to fire a port (left) or starboard (right) broadside, respectively.
Your camera is controlled entirely by your mouse - click and drag to orbit your camera around your ship (it'll stay where you leave it) and use your scroll wheel to move in and out.
Sink other ships by hitting them with cannon-fire to earn gold, the currency of this game. You can use this gold to upgrade various qualities of your ship, including your overall health, health regeneration speed, number of cannons, cannon damage, rate of cannon fire, and more. To upgrade, you have to click on the buttons below the main screen (though you can only upgrade each quality twice).
If your ship is destroyed, press the "Restart" button below the screen to begin once more.
If you'd prefer just to peacefully explore the vast, infinite ocean and the beautiful night sky, you can click on the "peaceful mode" checkbox below the upgrade options. I also recommend going into the "Fullscreen" mode, another button near this checkbox, in order to fully appreciate the rendering technology.
Gameplay Guide
My recommended method of play is to circle around the aft (rear) of enemy ships. All ships cannons face either perpendicularly out or somewhat forward, making it very difficult for enemy ships to hit you from that position. In addition, you are much, much faster than enemy ships, making it very easy to outrun them if you're in a tough spot. In addition, enemy cannons cannot shoot you while you're standing still - their "Orbital" AI pattern puts them (typically) outside of the range of their own cannons.
I personally go for the "Health Regeneration" upgrades first, as it reduces the amount of time you're vulnerable (at low health) for. "Damage" is great for sinking more ships faster, however, the more ships you sink the more dangerous incoming ships will be. "Multiple cannons" is a must, as it can effectively mean you double or triple your cannon damage by simply having more cannonballs at a time.
Barrels that float in the ocean can damage you, but they tend to be spread out far enough to not be a real concern, health-wise.
There are three oceanic landmarks that spawn in the world, far away from where you spawn. If you find all three (and email me a screenshot) I'll give you a digital high-five.
Technical Exploration
At the core of this game is - as almost all other games - a loop. On a fixed interval (provided by the Web Browser), we've got our primary loop that has two primary functions: rendering new frames, and updating any per-frame logic.
The "Update" functionality is simple - every object in the game has an "update" method, which is called by this master "update" section in our fixed loop. It's provided the current time (since the start of execution) and the time since the last update (deltaTime).
Rendering is a little more complicated, thanks to the Shadow functionality in our application. But, in short, everything that can be rendered has a "render" function that is called during the render pass.
The Ocean Shader
This was the most important - and fun - part of the project for me. While most of its core look stems from the pirate ship demo, the real beauty came from the additions and adjustments made for this project. The Ocean works like this:
The ocean is a simple plane, with its center aligned with the bottom of the player's ship. It translates as the player does on the x/z axes (y is up), but does not rotate or scale with the player.
In our vertex shader, we sample a Perlin noise algorithm at the world-space coordinates of each vertex. This is combined / shifted by some other settings to create our waves effect, and gives us a single floating-point value we use to offset that vertex vertically. We also go through and sample two other points - one vertex to the north, and one vertex to the east - and create a pair of vectors, from ourselves to each of those points. Taking the cross product of these two vectors and normalizing the result gives us our new normal vector for this vertex.
The fragment shader (the one responsible for how to transform these pixels into colors) does a lot of heavy lifting, but the unique things that it is responsible for include the mixing between different levels of ocean color and a "fading" effect. Primarily, we mix between a base "Ocean Color" and "Ocean Highlight," using the vertical displacement as the controlling factor. This creates an effect that somewhat replicates how ocean waves are slightly lighter in color as they crest - though this is a much more stylized visualization than the real-world. The fragment shader also fades out to the base "background color" of the world as it gets further from the player's origin (in a circle) so as to hide the planar nature of the ocean. It also handles some environment reflections, using the skybox as a cubemap, and receiving shadows and typical lighting.
Shadows
Shadows were accomplished in this project using the "Shadow Mapping" technique, where a depth texture (a 2D, greyscale image tracking how far a fragment is away from the camera) of the world is rendered from the perspective of a light source, then checked against during typical render time in order to determine whether or not a surface is in shadow. You can read more about the technique here, with some good visualizations and demos to go alongside.
It was a pain to get working, but once it did, it needed some further configuration. In the end, I'm not too happy with the result - it works fine for casting shadows onto the ocean, but thanks to my decision to bind the light source to the player's position (much like the ocean), there's some flickering effects that happen on static props, like the pillar or islands. This is because the resolution of the shadow map is low, compared to the area it is projecting on, resulting in floating point mess. Not a fan. In addition, shadows appear to be offset somewhat - the clearest example of this is the shadow of the player ship's mast upon the body of the ship. It appears to be floating. Not 100% certain what's going on with that, but I believe it's some constant somewhere I need to fiddle with to get things correct.
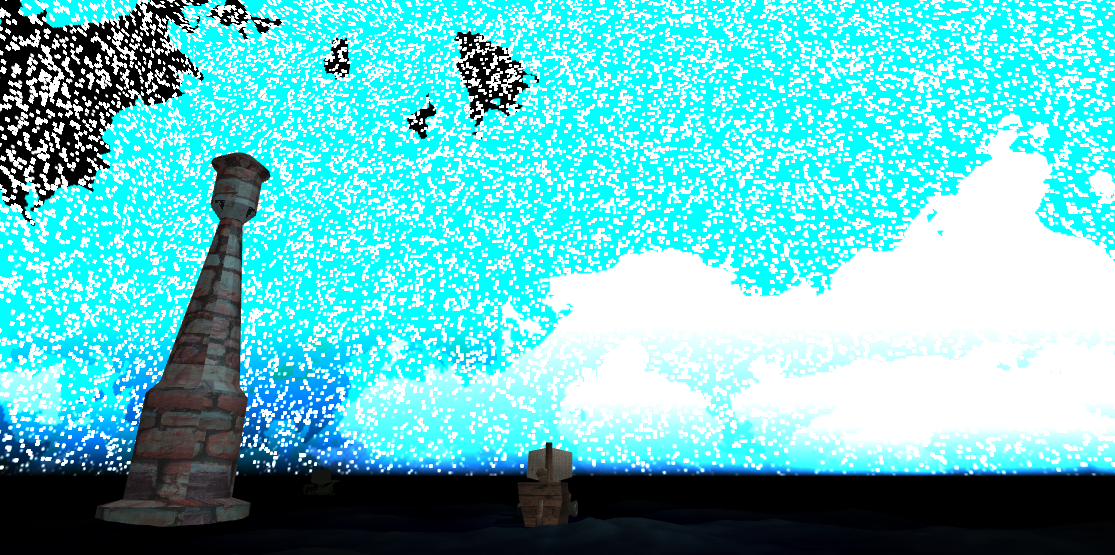
Skybox Blending
This was my favorite little graphical feature I added in - the skybox texture was generated from an online tool called Space 3D, but it had a major problem for me - it's designed for space. There's no horizon, no way for our small, planar ocean to match up smoothly. So, I adjusted the fragment shader for the skybox.
(Math Incoming)
Skyboxes are a 3D, cubic texture that surround the player, like you're sitting inside a gigantic box. However, the skybox isn't actually rendered as a cube, very far away from the player - it's instead a solid plane just at the rear edge of the space the camera renders. In order to make this flat plane appear as if it is some sky, we use the "inverse view projection matrix," or, the mathematical opposite of a matrix to transform a point in world space (x/y/z are centered on 0, 0, 0, imagine a traditional 3D world) into a point in our camera's projected view space (x/y/z are centered on the camera's origin, with -z axis pointing out the front of the camera, with perspective warping applied). With the inverse of this, we can take a point in our view (such as this full-screen plane) and get what that might represent in the world.
So, we just take our point in the fragment shader of this plane, get what "direction" it would be pointing in the world space, and then sample the 3D texture using this direction. Straightforward!
But we've got to blend it now. How do we do that?
Well, this "direction" vector is a world-space vector that points to where it will sample from. You can see it how it looks below, with the x/y/z coordinates normalized into r/g/b values.
Well, we can isolate that "y" value in order to determine how far up from the x/z plane that vector is pointing, yielding this:

We can use this value (scaled by some designer-designated constant) clamped between 0 and 1 in order to mix between a background color and our night sky, resulting in our sky that fades out into the horizon, as if there's a dense, dark fog there.

As a fun little thing, if you divide this "y" value by the "w" value of the vector, you get something like this:
That's fun, and pretty in its own way, but most certainly not what we want for this project.
Ship AI
The NPC AI was done by me, as a little experiment to see how well I could develop a simple set of behaviors without research. I'm happy enough with my final result, but now that I've actually done the research, there are lots of things I could have done differently - see this paper on various steering behaviors for the proper way to do things. Still, it was a fun challenge.
So, primarily, our NPC ships have three states - "idle," "hunting," and "orbiting." Idle is for when a ship is too far away from a player, and it just sits and does nothing (though that isn't used since Anna, my partner, implemented an NPC manager that spawns/despawns ships around the player). "Hunting" is used when the player ship is outside of cannon range, and "Orbiting" is for player ships inside of shooting range. This is all determined by measuring the distance to the player, and comparing that against some hard-coded values.
The AI updates every frame, as part of the NPCShip's "update" loop. These functions then update "control" values, also used by player input on the player pirate ship. These controls are then applied in the parent class's update function.
Hunting
"Hunting" is a very simple behavior: point ourselves at the player and press the "forward" button. It's a straightforward process, but let's see how we do that in math!
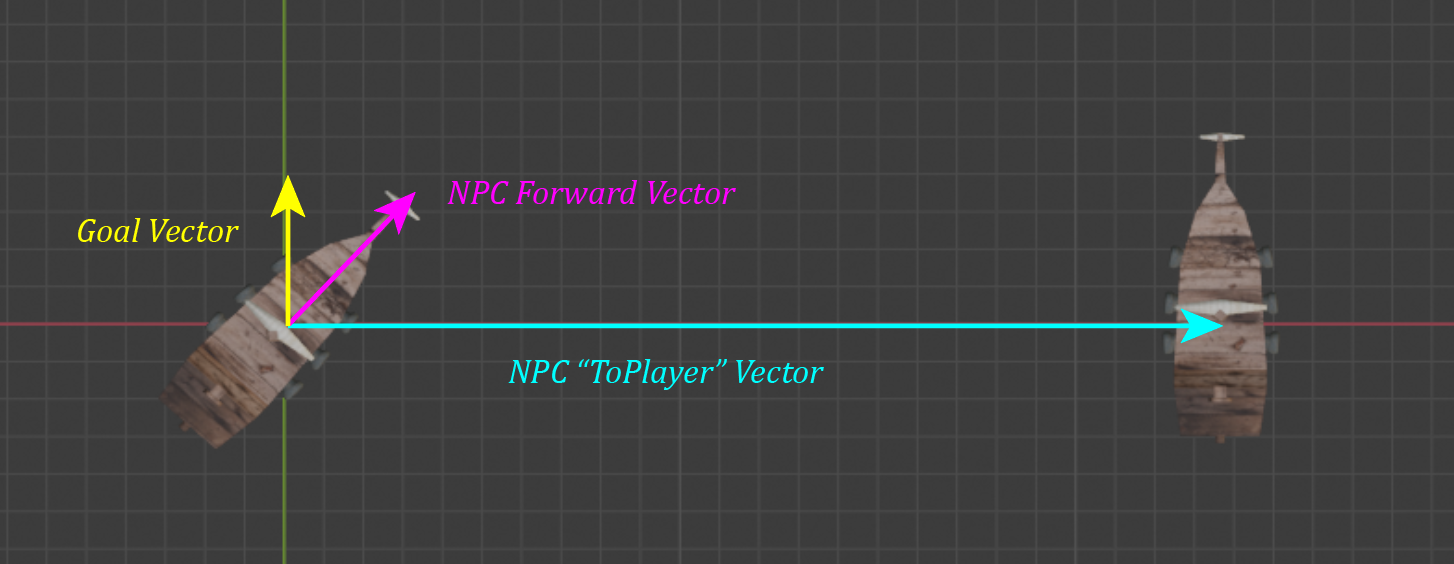
Our ship AI primarily operates on two pieces of information: their forward vector (pointing out the front of the ship) and a "ToPlayer" vector, pointing from their origin to the origin of the player ship. This is shown in an example below.
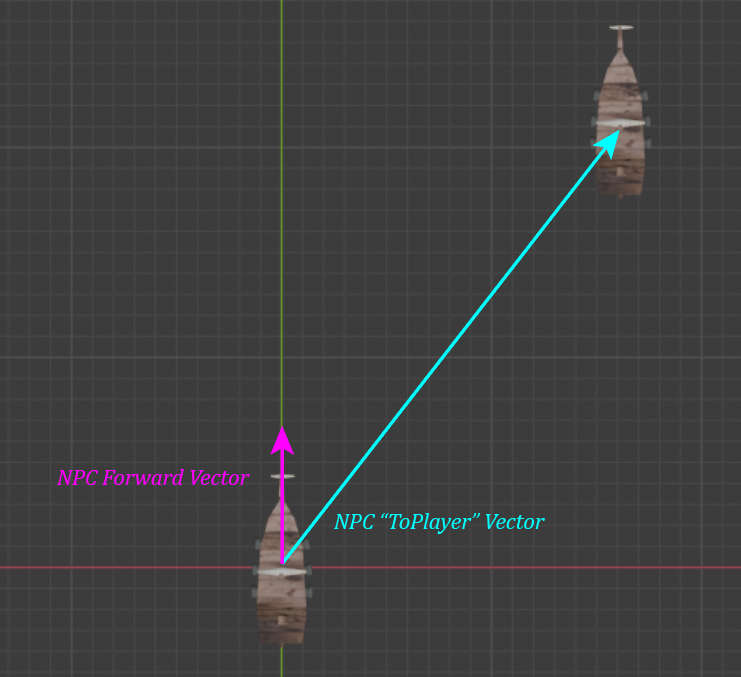
We've got two controls, accelerate forwards/backwards, and accelerate left/right. Each of these are calculated independently, because this is very simple.
For our forward/backward calculation, we can simply take the dot product of our forward vector and a (normalized) ToPlayer vector. If you don't remember, the dot product of two vectors is a scalar value between 1.0 and -1.0, with 1.0 meaning the vectors are pointed in the same direction and -1.0 meaning they're pointed in opposite directions. A 0.0 means they're exactly perpendicular. So, with our dot product, we can just check to see if this value is positive. If it is, accelerate forward. If not, accelerate backwards.
This created a fleet of ships that just matched my player's forward position. If we moved, so did the ships, all in formation. A fun little thing.
Left/Right was a bit more complicated - the dot product doesn't provide us information about which side the vector is on, just whether they're pointing in the same direction. Instead, we must use the cross product of these two vectors. The cross product of two vectors is a third vector, perpendicular to the first two with a magnitude equal to the product of the magnitude of the member vectors. The cross product, critically, flips direction based upon whether the second vector is to the left or right of the first (on the plane formed by the two vectors).
We can take the cross product of our forward vector and our toPlayer vector in order to get a resultant "LeftOrRight" vector.
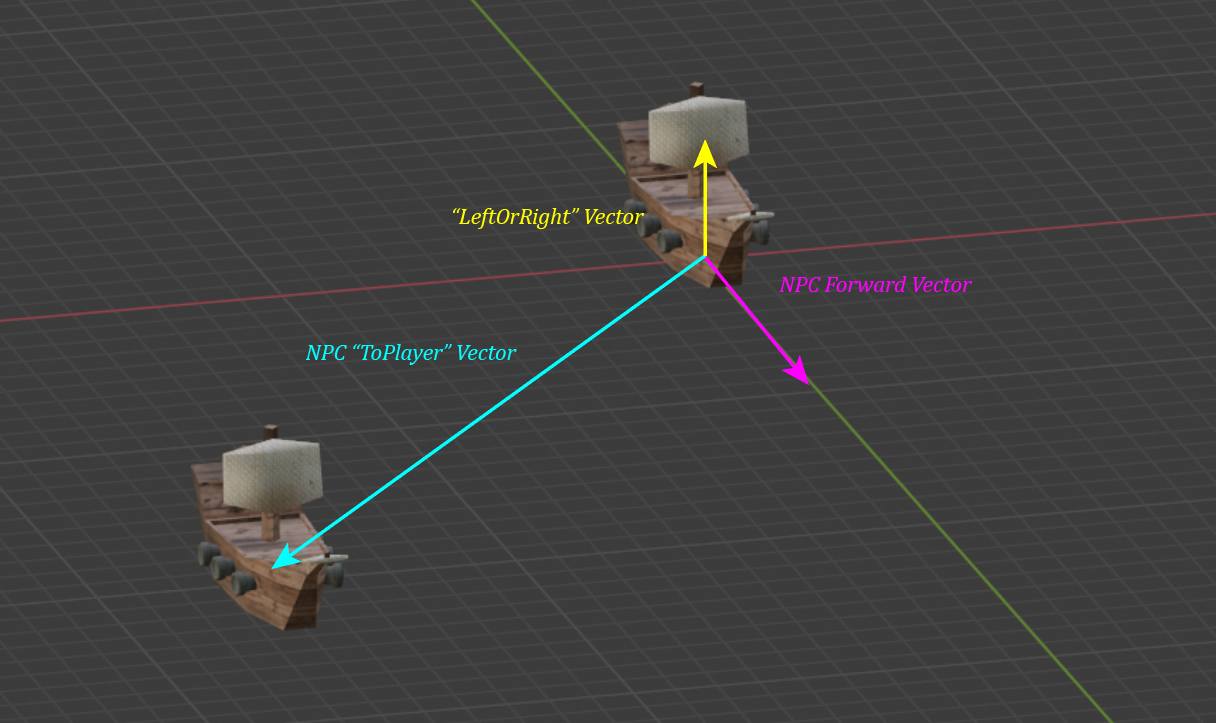
We can use the magnitude of the "y" component of this vector to determine if we need to turn left or right - positive for left, negative for right.
By combining these two controls, we can effectively drive an AI ship towards a player.
Orbit
This logic is a little more complicated in some ways, simpler in others. We want our ship to orbit in a perfect circle around the player, but how do we do that?
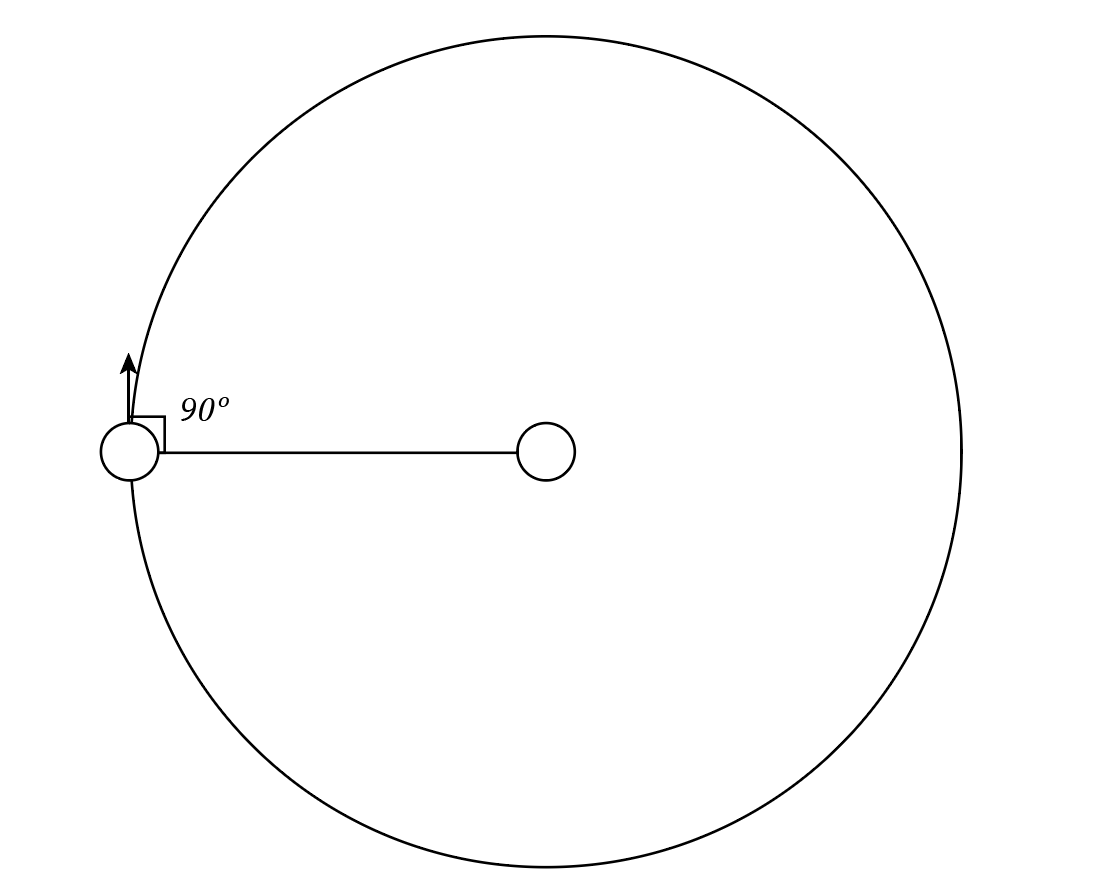
So, when one body is orbiting another, it is moving along a perfect circle. Its "forward" at any given point will always be tangent to the orbit, pointing out. As we see above, that is exactly perpendicular to a line pointing to the center of the orbit.
We can apply this to our pirate ship AI. We need to make our ships turn so that their forward vectors are pointing to be perpendicular to the vector to the player.
This "Goal" vector we require is simple to calculate - remembering that the cross product of two vectors results in a vector perpendicular to the first two, we can just cross the (normalized) "ToPlayer" vector with a vector that will always result in this goal. The "up" vector for our ship suffices - just [0, 1, 0].
From here, we can use the same rotational logic we used for the hunting AI - rotate the ship left or right, depending on whether the forward vector is to the left or right of this "goal" vector this time.
I got lazy here when it came to the forward/backwards acceleration - NPC ships orbiting want to go forwards at maximum speed. I'm sure there's some math to find the right speed for any given orbit, but this project didn't require such precision, and we were on a tight schedule.
A constant drive to go forwards works well enough with the orbit logic, even if it does mean that the ship ends up fighting itself (drives forward, turns to correct, etc.)
Cannon Logic
We've got ships hunting the player, circling around the player, but what about actually doing anything to the player? We've got to fire cannons at them.
This one is similar to the orbit logic, actually. We generate a "goal" vector, which is instead the cross product of our ship's forward vector and the same "up" vector from before, giving us a vector pointing directly out the side of our ship. We go through and get the dot product of that and the normalized ToPlayer vector, giving us a value between -1.0 and 1.0. We take the absolute value of that, and if it is within a certain threshold of 1.0, then the player ship is within the firing cone of our cannons (cone width is determined by the threshold).
A positive value means to fire one way, negative means the other.
Straightforward!
Cannonball Collision
A critical part of firing cannonballs is that you want them to actually hit something at some point. While the cannonballs natively removed themselves from existence when they were below the ocean, we needed something to detect that a cannonball has hit a pirate ship - or the player's ship. We looked at a few different options for this, everything from importing some existing physics library to implementing some fancy collision mesh handler. But we decided to step back a little bit, and just do something really basic, either Axis-Aligned Bounding Boxes (AABB) or Bounding Spheres.
Both techniques can be read about in detail here, on the Mozilla developer resources site, and I've used AABB on other projects before, but I'll review both real quick here.
Axis-Aligned Bounding Boxes are exactly what they sound like - rectangular prisms, defined by x/y/z max/min values, aligned with the three axes of the world space. It's very easy to check for intersections with these - just see if a given point is within the max/min values of a box, then it's colliding. It's a fast, easy solution that works well for many games - and is event used as a starting point for more precise collision algorithms, as an optimization step (you can see this in action in this YouTube video, showcasing how Team Fortress 2 makes use of AABBs to simplify some collision logic).
This system, however, isn't great for our game. You see, our ship is long and rectangular, which would be great for a bounding box. We can minimize the amount of empty space our collision volume takes up, meaning that it feels more fair to the player.
However, we can't actually turn this bounding box. Since it's axis-aligned, it can only be resized to fit our ship along the three major axes. This is fine when our ship is pointing directly along two of the major ones, but the worst case is when it's at a 45 degree angle to either, perfectly straddling the two, resulting in this:
You can see just how much extra space exists to the left and right side of the ship - all this space would count as valid collision volume, meaning that cannonballs that should have just sailed on by count as a hit. Not very fair to the player, and not very satisfying gameplay.
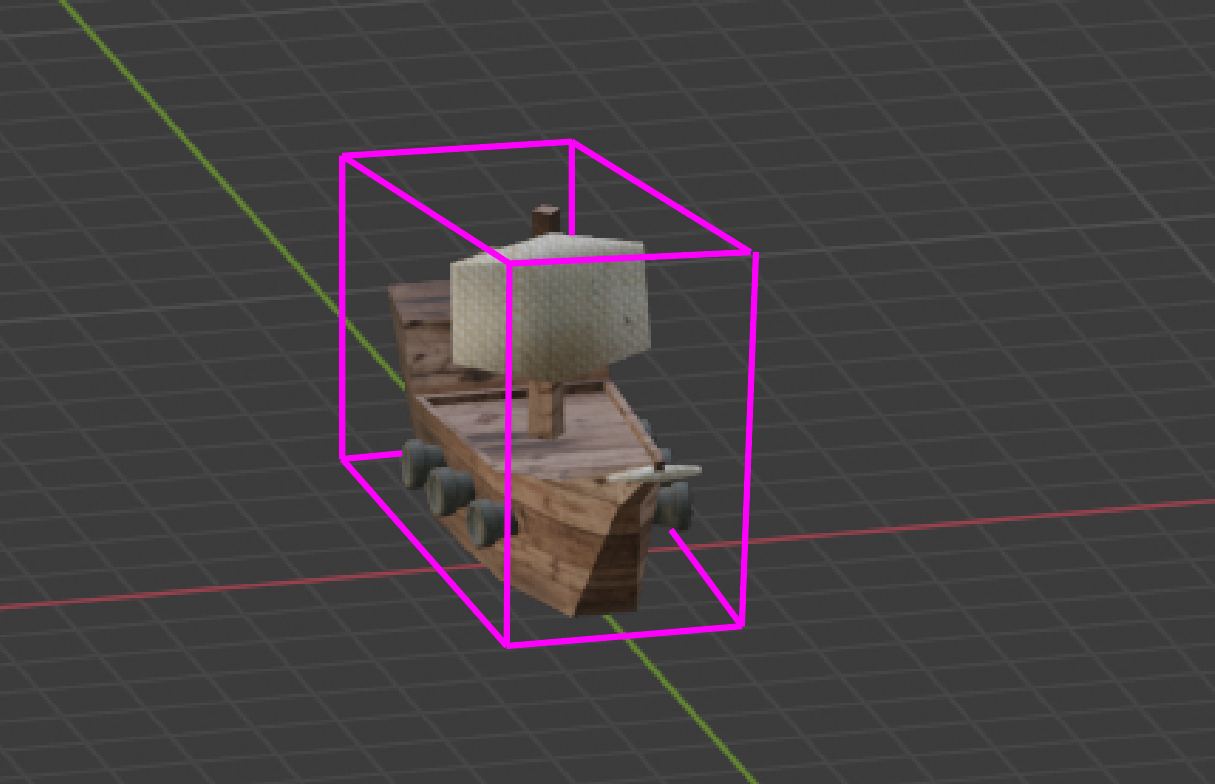
Instead, we can use collision spheres, shifted around to minimize wasted space. As they're spheres, they're consistent - no rotation is required, as they're rotationally symmetric about all axes. They're also really easy to detect - just calculate the distance from the point we want to test to the center of our collision sphere. If the distance is smaller than the collision radius, then we're intersecting. Fast, easy, and reliable. Oh, and we can speed it up by using the distanceSquared values instead of just distance, removing the sqrt step from our calculations.
Below is approximately the location and size of the final bounding sphere in our game.
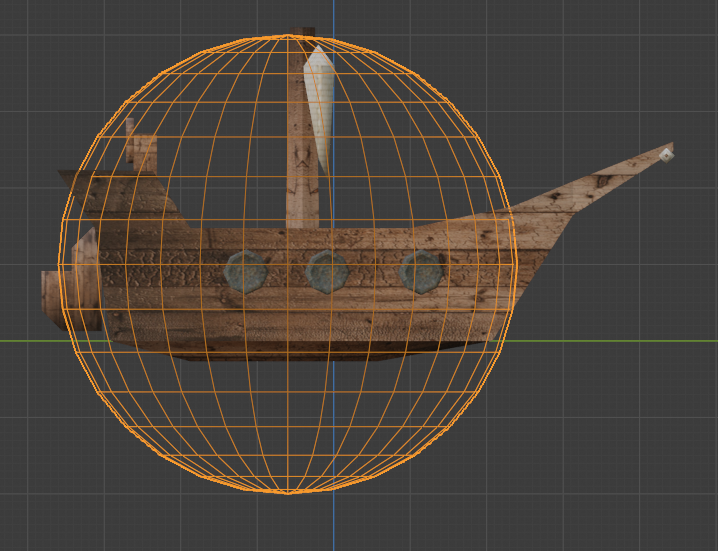
Visually, there's a ton of wasted space in the bottom. We have more than double the volume of the ship represented there, and it's quite notable. However, that doesn't matter. Cannonballs are deleted below the water, so they physically cannot interact with that space below the ocean line (green horizontal line in the diagram above). We're tightly bound to the important parts of our ship.
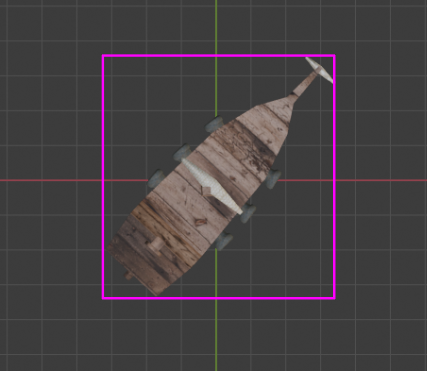
The picture isn't as pretty from above:
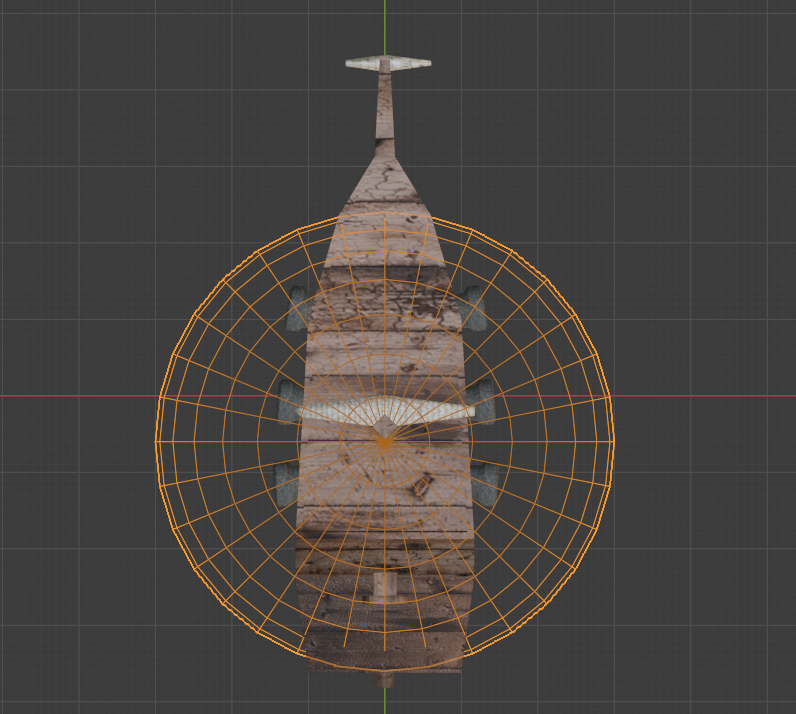
We've got a bit of wasted space to the sides of the ship. This is unfortunate, but it's better than the worst-case on the AABB setup. I'd even go so far as saying it's "fair enough," as any cannonball that close is probably going to hit your ship - with the exception of balls passing directly parallel.
In our play testing, we didn't notice any oddities with this setup. It's worked well enough, and is a quick and easy solution to our collision problem.
Each cannonball performs a collision check every update, checking if it is inside of the range of any of the collision objects (an array of collision objects is maintained). If it is, it goes through and calls the collision object's "hit" method, and then deletes itself.
Not the fastest algorithm, but when we only have a maximum of 5 ships on the sea at a given time, and we rarely have more than a dozen cannonballs flying through the air, there's little to no performance impact.
Closing
There's plenty more small things to discuss - the physics of the pirate ships, the way I've structured classes and objects, the NPC spawn manager - but I just wanted to hit the big things listed above. If you'd like to learn more about any topic, or have questions, feel free to contact me.
This project was the highlight of my fall of 2021, getting to build a whole game (and engine) from scratch in Javascript and WebGL in just three weeks was a lot of fun, especially considering it was my first time doing so. I couldn't have gotten through it without my partner, Anna Malaj, who ended up being responsible for the implementation of collisions, NPC spawn management, player upgrades, and more.
The project is fully available on the Observable site here: PiraSea / Thomas Stoeckert / Observable (observablehq.com)
The source code is embedded into the site - just click on any given cell to open up the code that it is responsible for.